How to Use a Battery Tender
Here's how to use a battery tender: match its voltage and chemistry to your battery, connect it while unplugged, then power it on and select settings as its manual directs. Check the status indicator and unplug it before removing the leads.
On this page (10 sections)
- How to use a battery tender step by step
- What should you check before connecting?
- How do you connect clamps or ring terminals safely?
- When should you select 6V or 12V?
- How do you monitor charging?
- How long should you leave it connected?
- Can you use a battery tender on a car in storage?
- Which mistakes cause charging problems?
- What should you do if the tender won't charge?
- How do you choose the right tender and use it well?
Here's how to use a battery tender: match it to your battery, connect its leads while unplugged, then power it on and choose the settings its manual requires. Check the status indicator before leaving it, and unplug it before removing the leads.
A tender charges a compatible battery and maintains its charge during storage. If you're choosing your first one, what a battery maintainer is explains how that maintenance function works.
How to use a battery tender step by step
Check compatibility before connecting anything, then follow the charger and vehicle instructions for lead placement and mode selection. Some vehicles have remote charging points that you should use instead of the battery terminals.
- Read the battery label for voltage and chemistry, and confirm the charger supports both.
- Check the battery's permitted charging current against the tender's output.
- Turn off the vehicle, remove the key, and switch off accessories.
- With the tender unplugged, attach its leads in the order and at the points the manuals specify.
- Secure the cables away from belts, fans, exhaust parts, and hood hinges.
- Plug into a suitable outlet and select the required mode in the sequence the charger manual gives.
- Confirm normal charging on the indicator, then check periodically as directed.
- When finished, unplug the tender and remove its leads in the required order.
Don't charge a frozen, leaking, swollen, damaged, or unusually hot battery. If smoke, a burning smell, or unexpected sparking occurs, keep clear and disconnect power only if you can do so safely.
How do you use a battery tender for the first time?
Stay nearby until you confirm normal operation and understand the status lights. Check that the selected mode matches the battery and that neither cable is pulling on a terminal.
Keep the manual accessible so you can identify an error without guessing. Before starting the vehicle, disconnect and stow the charging cable unless the equipment instructions expressly allow otherwise.
What should you check before connecting?
Read the battery label, not just the vehicle badge, because replacement batteries can differ from the original. Voltage, chemistry, and allowed charging current all affect compatibility.
AGM and gel are lead-acid types, but their charging requirements can differ from flooded batteries. Lithium is a broad category, so support for LiFePO4 doesn't mean support for every lithium battery.
Check the tender's case, plug, and insulation for damage. Use a dry, ventilated location, keep ignition sources away, and follow the manual's clearance requirements.
For a flooded battery with serviceable caps, follow its maker's electrolyte-care instructions. Don't open a sealed AGM, gel, or lithium battery.
How do you connect clamps or ring terminals safely?
Use clamps for temporary connections and approved ring-terminal leads for repeated access, following the installation instructions. A permanent lead can save you from reaching into a tight battery compartment each time.
For a typical negative-ground vehicle, instructions commonly call for positive first and an approved ground connection last. Confirm the actual sequence and ground point in your manuals, since vehicle layouts and grounding systems vary.
Keep clamps apart and prevent the positive clamp from touching vehicle metal. Place the charger away from the battery as directed, never directly above it.
Ring terminals need secure attachment without disrupting existing battery connections or sensors. Protect the disconnected connector with its cap if fitted, and route it where a hood or seat cannot crush it.
See how to hook up a battery tender for more help with connection points and cable placement.
When should you select 6V or 12V?
Choose the voltage printed on the battery, and use only a chemistry mode approved for it. Don't infer voltage from the battery's size or assume a selectable charger detects it automatically.
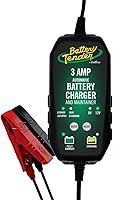
The Battery Tender 3A suits someone maintaining compatible batteries across older 6V equipment and modern 12V vehicles. Its push-button voltage selection is useful when one charger moves between those jobs.
Choose it for routine care when the battery allows its charging current, particularly if you don't need a quick recharge. Skip it if you need faster turnaround on a large depleted battery or the battery requires a lower current.
It supports flooded lead-acid, AGM, and gel batteries. For a lithium battery, confirm the exact supported chemistry and mode in this model's manual before choosing it.
How do you monitor charging?
Use the manual's light guide to identify charging, maintenance, and fault states. A maintenance light means the charger has reached that stage; it doesn't prove the battery will start a vehicle or hold charge after disconnection.
The Battery Tender 4A combines a two-color LED with automatic float maintenance and switchable voltage. It supports lead-acid types and compatible LiFePO4 batteries, making it a useful choice for someone caring for equipment with different battery requirements.
Choose it if you need that chemistry flexibility and your batteries permit its output. Skip it for an unsupported lithium chemistry, or if you want a fixed-voltage charger with fewer settings to manage.
Check the mode whenever you move it between batteries. If an error appears, unplug it before inspecting the connections and follow the fault instructions.
How long should you leave it connected?
Let the charging stages and manual guide you, rather than choosing a fixed number of hours. Battery capacity, charge level, temperature, and condition affect the time needed.
A tender can take a long time to refill a depleted vehicle battery. Higher output can shorten charging under suitable conditions, but the battery must permit that current and charging slows near full.
The Battery Tender 5A 12V suits drivers who want more charging output for a compatible car battery along with automatic maintenance. Its charging sequence includes qualification, bulk, absorption, and float stages.
Choose it for a 12V-only setup where replenishing charge matters alongside storage care. Skip it for 6V equipment or a small battery whose maximum allowed charging current is below its output.
Battery Tender says its 72-hour timer helps protect marginal batteries. That timer is a safeguard, not a promised charging duration or proof that a weak battery can be restored.
For extended use, read whether you can leave a battery tender on all the time. Follow the permitted maintenance arrangement and inspection schedule.
Can you use a battery tender on a car in storage?
Yes, when the battery, vehicle, and tender instructions allow it, and the storage location has suitable power and ventilation. Charge before storage rather than expecting maintenance mode to fix an already failing battery.
Check the cable route after closing the hood or other access panel. Leave the charger visible enough to inspect its indicator, with its ventilation openings clear.
Recheck connections and cable condition periodically, and after anything has moved near the vehicle. If the setup is exposed to dampness, confirm the equipment is approved for those conditions.
For the rest of the storage routine, follow how to winterize a car for storage.
Which mistakes cause charging problems?
Wrong settings, poor connections, and unrealistic recovery expectations cause avoidable trouble. Check the setup before blaming the tender.
- Choosing by vehicle size alone: Read the actual battery specifications, including its current limit.
- Guessing indicator meanings: Similar light colors can mean different things across chargers.
- Leaving accessories running: Their power draw can slow charging or keep the charger from reaching maintenance.
- Pinching the cable: Check hinges, hood edges, and seat latches before walking away.
- Repeatedly restarting a fault: Read the fault instructions instead of trying to bypass a protection feature.
Automatic float control helps manage charging, but correct compatibility still matters. See whether a battery tender can harm a battery if you're concerned about long-term use.
What should you do if the tender won't charge?
Unplug it before checking the leads and settings, then use the manual's fault guide. Confirm that the outlet works and that the approved connection points are secure and free of heavy corrosion.
A very low battery may fall below the charger's detection threshold. Don't connect another battery or override protections unless the equipment instructions specifically authorize that procedure.
If charging completes but the vehicle soon struggles to start again, arrange a battery and vehicle electrical check. A worn battery or continuing electrical drain needs attention beyond keeping a tender attached.
How do you choose the right tender and use it well?
Choose compatibility first, charging current second, and connection convenience third. All 3 models here offer charging followed by float maintenance, so voltage and battery needs should drive the decision.
Pick the 3A for routine care across compatible 6V and 12V equipment. Choose the 5A for a compatible 12V battery when recharge speed matters more, or the 4A when you need selectable voltage and explicit LiFePO4 support.
For more options, compare battery maintainers and chargers for cars, trucks, and boats. If you're considering a simpler device, learn what a trickle charger does before assuming it offers the same charging control.
Knowing how to use a battery tender starts with choosing a model your battery can accept. Use how to choose the correct battery tender to settle compatibility before ordering, then keep the connection and mode checks part of every charging session.
Frequently asked questions
Should a battery tender be connected before or after plugging it in?
Connect the leads before plugging the tender into an outlet, using the order and connection points in the charger and vehicle manuals. Secure the connections and keep the cables clear of moving parts, then apply power and select settings as directed; unplug it before disconnecting.
How do I know if a battery tender is working?
Read the status indicator using the light guide in your charger's manual. It should show a normal charging or maintenance state for that model, but a maintenance light doesn't prove the battery can hold a charge; repeated starting trouble calls for a battery and vehicle electrical check.
Can I use a battery tender on an AGM battery?
Yes, if the tender supports AGM batteries and matches the battery's voltage and permitted charging current. Check the battery label and both manuals before connecting, then select the required mode; a charger that supports flooded lead-acid batteries doesn't automatically support every AGM battery.
Can I leave a battery tender connected overnight?
Yes, when the charger and battery instructions allow overnight use and the setup meets their requirements. Confirm normal operation before leaving it, provide the required ventilation and clearance, and keep cables protected; automatic maintenance mode doesn't remove the need to inspect the battery and connections.