How to Hook Up a Battery Tender
Here's how to hook up a battery tender: connect the leads with the charger unplugged, then connect power as its manual directs. Match the battery voltage and chemistry, and follow the vehicle manual for approved connection points.
On this page (9 sections)
- What should you check before hooking up a battery tender?
- How to hook up a battery tender step by step
- Should you use clamps or ring terminals?
- Which battery tender suits your hookup and charging needs?
- How do you know the battery tender is working?
- What mistakes should you avoid during storage charging?
- How do you disconnect a battery tender safely?
- What should you do if the battery tender won't charge?
- How should you choose and hook up a battery tender?
Here's how to hook up a battery tender: connect its leads with the charger unplugged, then connect power as the charger manual directs. Match the battery voltage and chemistry, and use the connection points approved by the vehicle manufacturer.
For a typical negative-ground vehicle, that means positive first, then the designated chassis ground away from the battery. Confirm your vehicle's procedure before starting, especially if it has remote charging terminals or a battery monitoring system.
What should you check before hooking up a battery tender?
Match voltage, chemistry, and charging current before attaching either lead. A connector that fits doesn't prove that the charger suits the battery.
Read the battery label to identify its voltage and type, such as flooded lead-acid, AGM, gel, or LiFePO4. Check the battery's permitted charging current, especially on small motorcycle or lawn equipment batteries.
Stop if the battery is cracked, leaking, swollen, frozen, or otherwise damaged. Don't charge through loose terminals, badly corroded connections, damaged clamps, or split cable insulation.
Park in a well-ventilated area, turn the vehicle off, and remove the key. Wear eye protection and keep sparks, cigarettes, and flames away from the battery.
A maintainer's main job is to keep a suitable battery charged during storage. Read what a battery maintainer does if you're deciding between storage care and recharging a low battery.
Can you hook up a battery tender with the battery installed?
You can often leave the battery installed if the vehicle and charger manuals allow it. Use any specified remote positive terminal and ground point instead of choosing your own.
Some vehicles use a battery sensor that affects where the negative charging lead belongs. Don't bypass the designated connection point just because the negative battery post is easier to reach.
How to hook up a battery tender step by step
Make the battery connections before supplying AC power. The following sequence describes a common negative-ground vehicle setup; use the manuals' procedure if yours differs.
- Unplug the charger. Turn it off too, if it has a switch, and confirm that neither clamp touches the other.
- Confirm the battery settings. Identify the required voltage, chemistry, and charging current before starting.
- Find the approved connection points. Locate the positive terminal or remote positive post and the designated ground point.
- Attach the red positive lead. Secure it to the approved positive connection.
- Attach the black negative lead. Use the specified chassis or engine ground away from the battery, fuel lines, and moving parts.
- Route and inspect the cables. Keep them clear of fans, belts, exhaust parts, and hood edges.
- Set the mode and connect power. Follow the charger manual's order, since some controls operate only after power is connected.
Don't start the vehicle with the charger attached unless its manual expressly allows it. Disconnect and stow the charging cable before driving.
How do you hook up a battery tender to a removed battery?
Follow the charger's separate procedure for a battery outside the vehicle. There is no vehicle ground point, and the instructions may require an additional cable to keep the final connection away from the battery.
Keep the battery upright on a stable surface in a ventilated area. Place the charger beside it as directed, rather than on top of the battery.
Should you use clamps or ring terminals?
Use clamps for occasional charging and a compatible ring-terminal harness for repeated connections. Either option must fit the vehicle's approved connection points.
Clamps suit a charger you move between vehicles. Check that each clamp grips firmly and cannot rotate into another terminal or nearby metal.
A ring-terminal harness can reduce repeated access to a hard-to-reach battery. Installation still requires the correct terminal size, routing, and any fuse protection specified by the harness and vehicle instructions.
Secure a permanent harness away from heat and moving parts, and protect its disconnected plug as directed. Don't assume similar-looking quick-connect plugs are electrically compatible.
Which battery tender suits your hookup and charging needs?
Choose by battery compatibility first, then charging rate and connection style. More current helps only when the battery permits it, and routine storage care doesn't always call for a larger charger.
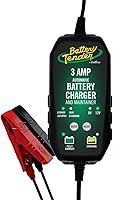
Battery Tender 3A: for mixed-voltage storage needs
Choose the Battery Tender 3A if you maintain compatible 6V and 12V batteries. Its push-button voltage selection makes it useful when your vehicles don't all use the same voltage.
Its 3A output suits batteries that permit that charging current, and it switches to float mode after charging. The two-color LED gives you a charging-status reference once connected.
Skip it if your battery requires a lower current or you need more charging output for a larger battery. For lithium use, confirm support for your exact battery chemistry and the required mode before connecting.
Battery Tender 5A 12V: for routine car charging
Choose the Battery Tender 5A 12V for a compatible vehicle battery that needs both recharging and storage maintenance. It supports flooded lead-acid, AGM, gel, and LiFePO4 batteries.
Its charging cycle moves through qualification, bulk, absorption, and float. Compared with the smaller model, its higher output can shorten recharging when the battery accepts that current.
Skip it for a 6V battery or a small battery whose current limit is below its output. It also isn't the choice if you need selectable charging rates for several battery sizes.
Battery Tender 15A: for different battery sizes
Choose the Battery Tender 15A if you need selectable current and a more detailed display. Its 12V output supports compatible lead-acid batteries, including AGM and gel, plus LiFePO4.
The LCD shows the selected rate, battery type, charge percentage, and errors. That information helps you confirm your selections before leaving the charger running.
Skip it for 6V batteries or if you want an included ring-terminal connection for frequent storage hookups. Its higher setting is useful only when the battery permits that current.
For a broader shortlist, compare the best battery tenders. The guide to choosing the right battery tender or maintainer explains how to match a charger to your battery.
How do you know the battery tender is working?
Read the indicator using the charger's manual and confirm that no fault appears. Light colors and flashing patterns have model-specific meanings, so don't assume green always means the same thing.
Check shortly after starting that the connections remain secure and the cables are clear. If you notice excessive heat, smoke, hissing, swelling, or an unusual smell, stop charging and disconnect AC power if safe.
If charging never finishes or faults return, investigate the battery and any vehicle electrical drain. Repeatedly restarting the charger won't repair a failing battery.
Read how to use a battery tender for charging stages. If you're comparing charger types, see what a trickle charger is.
What mistakes should you avoid during storage charging?
Avoid the wrong mode, pinched cables, and unchecked connections. Automatic float charging still depends on a suitable battery and a sound setup.
Don't select a lithium mode for a lead-acid battery or assume every lithium battery uses the same charging profile. Recheck settings whenever you move the charger to another vehicle.
Don't close a hood onto the cable or leave an attached lead where someone could drive away with it connected. Keep the charger dry and ventilated as its manual requires.
Inspect the setup periodically during storage, including after a power interruption. See whether you can leave a battery tender on all the time before planning an extended connection.
How do you disconnect a battery tender safely?
Unplug AC power before removing the battery connections. On a typical negative-ground clamp setup, remove the ground connection first and the positive connection last, following both manuals.
Keep the clamps apart and unplug by gripping the plug rather than pulling its cord. Inspect the leads before storing them without tight bends or strain.
With a permanent harness, follow its quick-disconnect procedure and secure the loose connector. Check its routing before returning the vehicle to use.
What should you do if the battery tender won't charge?
Unplug it before checking polarity, connections, settings, and battery condition. Don't force clamps onto damaged terminals or repeatedly clear an unexplained fault.
A deeply discharged battery may fall below a charger's detection threshold. Don't bypass its protections or improvise a recovery method.
Read whether a battery tender can charge a dead battery before expecting maintenance charging to restore one.
How should you choose and hook up a battery tender?
Choose the 3A for compatible mixed-voltage batteries, the 5A for routine 12V charging, or the 15A for selectable current. Let the battery's permitted charging rate decide which output is appropriate.
Knowing how to hook up a battery tender starts with the right match: approved connection points, correct settings, and leads attached before AC power. If you need a different charger for your vehicle, compare battery maintainers and chargers for cars, trucks, and boats.
Frequently asked questions
Do you connect a battery tender before plugging it in?
Yes, connect the leads with the charger unplugged, then connect it to power as its manual directs; turning a charger off does not replace unplugging it before attaching or removing leads. Check the required battery mode and connection points before starting, and keep the clamps apart.
Which battery terminal do you connect first?
For a negative-ground vehicle, the usual sequence is positive first, then the designated chassis ground away from the battery; follow the vehicle and charger manuals for your setup. Positive-ground vehicles and batteries removed from vehicles need their own procedures, so don't assume the same sequence applies.
Can I connect a battery tender to a battery without removing it?
Often, yes, if the vehicle and charger manuals allow charging with the battery installed; some vehicles require a remote positive terminal and a designated ground point so charging works with their battery monitoring system. Route the leads clear of fans, belts, hot parts, and panels that could pinch them.
Can I use a battery tender on any car battery?
No, the charger must match the battery's voltage, exact chemistry, and permitted charging current; a lithium setting is not suitable for every lithium battery. Read the battery label and both manuals before connecting, and don't charge a cracked, leaking, swollen, frozen, or otherwise damaged battery.